How to configure Microsoft Edge Site Lists
By now the Microsoft Edge browser has been a source for a few articles on my blog. In the beginning of 2020, I wrote my first article about Microsoft Edge, which I posted shortly after Microsoft Edge was released in the first public stable version. A common denominator for all of the articles are features that bring better security, better performance and/or a better user experience, and even though a few of the articles are targeted Citrix Virtual Apps and Desktop setups, you will be able to use my articles to setup and configure Microsoft Edge in pretty much any Windows based setup.
According to Microsoft, Edge is still supported on Windows 7 and Windows Server 2008 R2, all though this is coming to an end early next year, so plan accordingly. Also, with the upcoming end of life of Windows Server 2012/2012 R2 and Windows 8/8.1, I estimate that these operating systems are probably next in line to lose Edge support.
If you are on other Windows operating systems, you are good to go for quite some time.
Microsoft Edge is also supported in other operating systems like MacOS, Android and iOS, so there is plenty of opportunity to provide a great internet browser experience across different platforms with Microsoft Edge.
The main focus of this article is to provide some guidance on how to configure the Microsoft Edge Site List. The Microsoft Edge Site List is needed when the Internet Explorer Mode (IE Mode) feature is enabled in Microsoft Edge.
I will not cover IE Mode in depth in this article, as I have a couple of different articles covering IE Mode. However, in short IE Mode is a feature to help you transition from Internet Explorer to Microsoft Edge.
I have a few articles covering the IE Mode feature, how to build the site list XML file and how to configure IE Mode in Microsoft Edge. My latest article which among other things is covering IE Mode, can be found here. However, keep in mind that this is the old way of doing things, I strongly recommend migrating to the Microsoft Edge Site List feature.
Table of Contents
The current state of Internet Explorer 11
Support status – End of life
Back in june 2022, Microsoft retired Internet Explorer in certain versions of Windows 10. This means that Internet Explorer is no longer supported and will no longer receive feature and security updates, this should be a very strong indicator to start moving away from Internet Explorer, preferably to Microsoft Edge.
Internet Explorer 11 in Windows 10
Currently Internet Explorer is still a part of Windows 10, it’s still working, and users will be able to access the browser unless we either block it or remove it from Windows 10. According to Microsoft come February 2023, IE will be permanently blocked via the February CU, so again plan accordingly. If you haven’t already, I recommend that you start planning for the configuration and implementation of IE Mode in Microsoft Edge.
Internet Explorer 11 in Windows 11
Out of the box, Internet Explorer is not a part of Windows 11 and it cannot be installed. This means that if you are on Windows 11 the parts where Internet Explorer is disabled or removed, does not apply to you and you can skip to the part where the Microsoft Edge site list is configured.
Disable Internet Explorer 11
Until we reach February 2023, you can either block Internet Explorer or flat out remove it from Windows 10. If you choose to remove Internet Explorer 11, the user facing part of Internet Explorer 11 is removed, which means that users will no longer be able to access Internet Explorer, however IE Mode in Microsoft Edge will of course still work. There are some pretty close ties between certain parts of Windows and Internet Explorer, like the Internet Options feature where you are able to configure Trusted Sites, Local Intranet Sites etc. this will not go away when you remove Internet Explorer.
Disable IE11 via a group policy object
Make sure you have the latest group policy administrative templates for Windows 10 or Windows 11
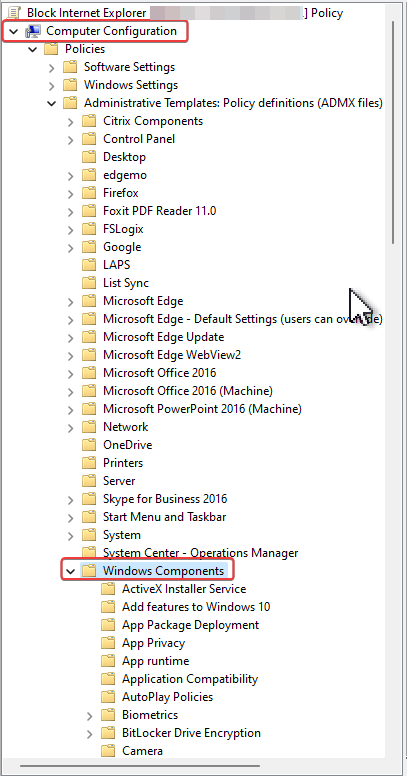
Create a new group policy object. Go to Computer Configuration\Windows Component\Internet Explorer

Enable the Disable Internet Explorer 11 as a standalone browser policy and configure the notification settings
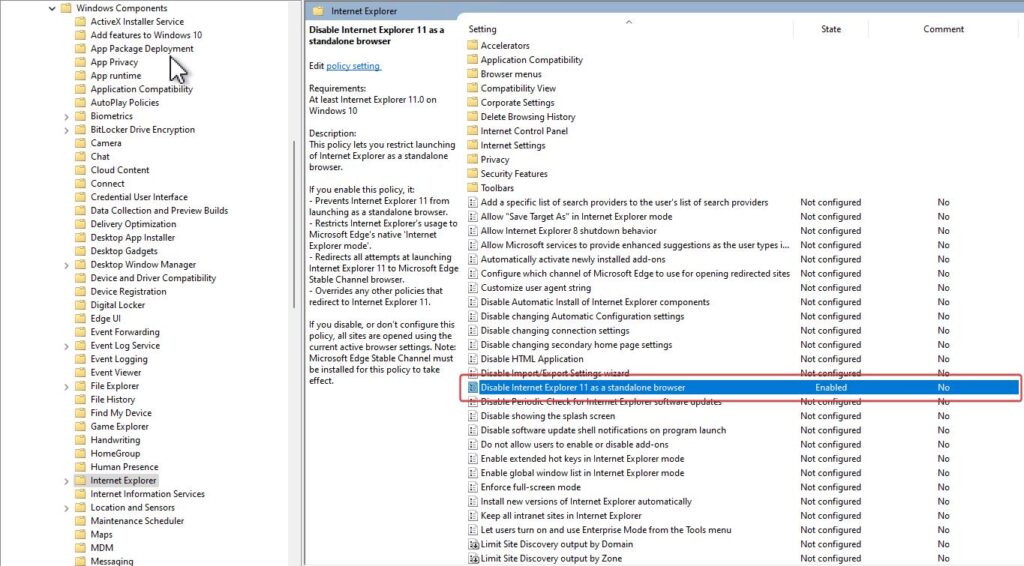

With this policy you can disable Internet Explorer 11 and notify the user once via a popup box, saying that Internet Explorer 11 has been disabled
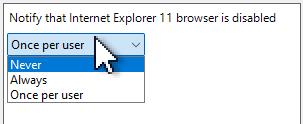
In the notification settings you are also able to notify the user every time Internet Explorer 11 is launched with the “Always” option, and you are also able to configure that the user is not notified at all, with the “Never” option.
Disable IE11 via Microsoft Intune
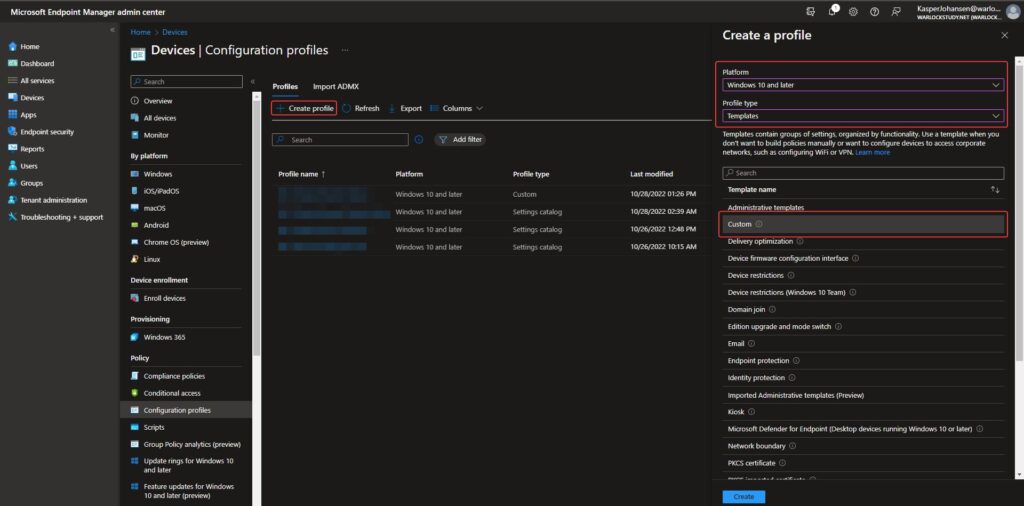
Login to your Microsoft Intune admin center and create a new Device Configuration Profile
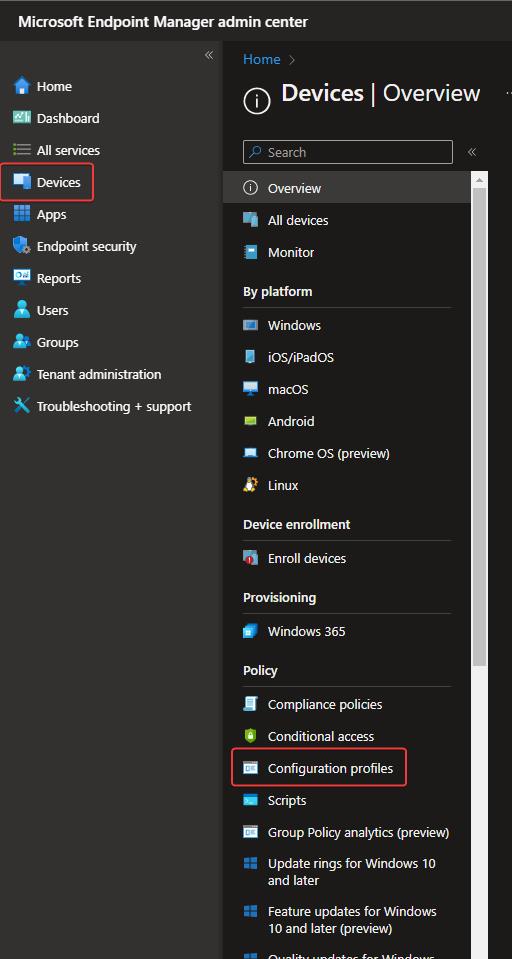
Click Create Profile and create a custom profile
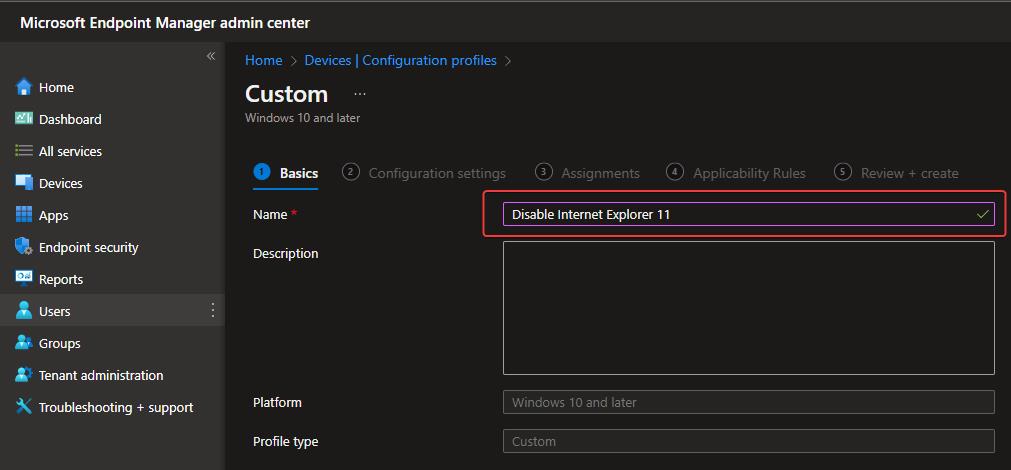
Name the custom configuration profile
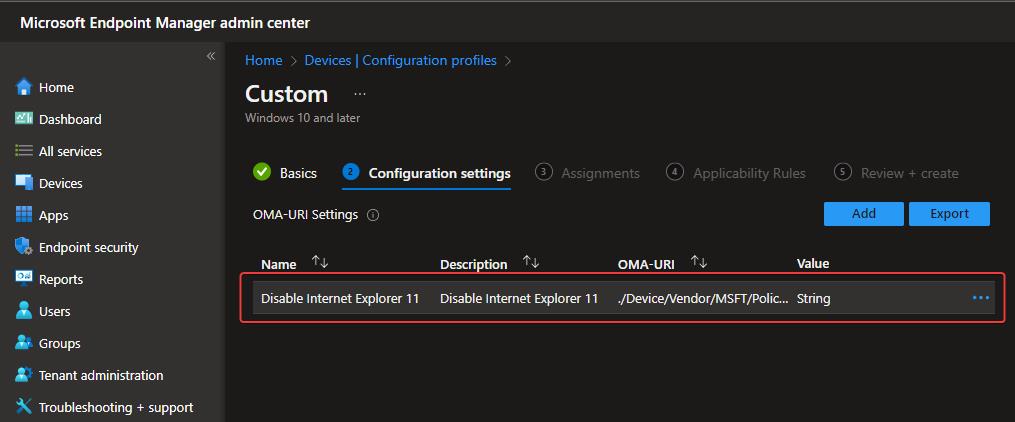
Add an OMA-URI setting, provide a name and a description and the OMA-URI, data type and value:
OMA-URI: ./Device/Vendor/MSFT/Policy/Config/InternetExplorer/DisableInternetExplorerApp
Data type: String
Value: <enabled/><data id=”NotifyDisableIEOptions” value=”2″/>

The OMA-URI Settings should now look like this
Click through the rest of the wizard and provide an assignment group and applicability rules if needed.
Now wait a bit to make sure the new configuration policy has been applied.
Internet Explorer 11 – How it looks on the user side
As soon as the configuration has been applied to the Windows 10 computer, Internet Explorer 11 is blocked. The next time the user launches Internet Explorer 11, they are met by this popup box:
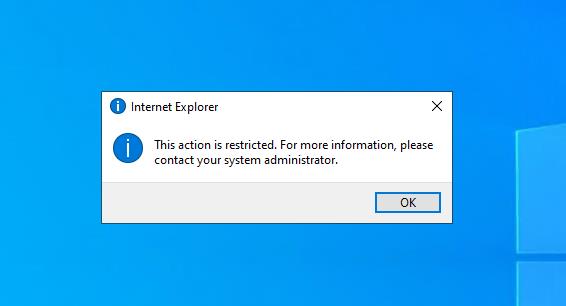
From there on out, Internet Explorer 11 is now longer accessible. It is removed in the user’s start menu, and the user will no longer be able to find Internet Explorer 11 when doing a search. The URL the user was trying to access via Internet Explorer 11 is redirected to Microsoft Edge.
If you browse C:\Program Files and C:\Program Files (x86) you are still able to access the Internet Explorer folder however, launching iexplore.exe just redirects to Microsoft Edge.
Remove Internet Explorer 11
If you want to completely remove Internet Explorer 11, this can be done either manually or via a script. If you choose to remove Internet Explorer 11, it’s not necessary to disable Internet Explorer 11 via group policy or an Intune configuration policy.
Manual approach
The manual approach is configured via Windows Features where you are able to turn features on or off
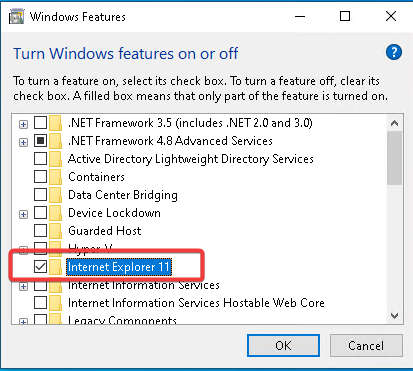


Once you remove the checkmark in the Internet Explorer 11 box, the Windows features wizard will chew on it a bit, and then prompt you for a reboot. However, we can’t go around manually removing Internet Explorer 11 on every computer and as it requires local administrative privileges, it is not something a regular user are able to do.
Scripted approach
Internet Explorer 11 can be remove with a small Powershell script, using the Get-WindowsCapability command.
This means that we are able to fit in this script in whatever central management solution in use, as long as this solution supports Powershell script execution.
All you need is this:
Get-WindowsCapability -Name "Browser.InternetExplorer~~~~0.0.11.0" -Online | Remove-WindowsCapability -OnlineAfter the script has been executed, a reboot is needed.
Microsoft Intune Proactive Remediation
If you have Microsoft Intune and Microsoft 365 E3/E5 licenses, you are able to use the Proactive Remediation feature to remove Internet Explorer. Proactive Remediation allows you to determine if Internet Explorer 11 is present in Windows 10, and if it is, then execute a Powershell script to remove it.
One of the benefits of using Proactive Remediation is the reporting feature. With this you are able to monitor the Internet Explorer 11 removal progress across all computers enrolled in Intune.
If you need information about how to implement an Internet Explorer 11 removal script in Proactive Remediation, credit goes out to MVP Nicklas Ahlberg for a great article describing how to use Proactive Remediation in Intune to uninstall Internet Explorer.
Update: 11/11-2022:
I have been made aware that if you remove Internet Explorer in Windows 10, IE Mode doesn’t work anymore. This means that you should only remove Internet Explorer 11 if you are absolutely certain that you are not going to use either Internet Explorer 11 or IE Mode. With this in mind, I would recommend disabling Internet Explorer 11 rather than removing it.
How to configure Microsoft Edge Site list
Now that Internet Explorer 11 is taken care of, either blocked or completely removed, it’s time to configure the Microsoft Edge Site List. With this feature you are able to configure certain sites to launch in IE Mode within the Edge browser, making the transition between IE Mode and non-IE Mode seamless to the user.
Be aware that you need to have Microsoft Edge version 93 or later and the latest Edge group policy template files to be able to configure the Edge Site List feature via group policy. You will also have to enforce Edge sign-in, otherwise the site list will not be available, as it requires Azure AD authentication to get the site list.
Microsoft 365 admin center
The Microsoft Edge Site List feature is only accessible via the Microsoft 365 admin center. You need to at least have the Edge Administrator role permissions to be able to create, manage and delete site lists.
As this list lives in the cloud, it’s a huge improvement to other ways of providing the site lists to computers or users. Before the Edge Site List feature, we had to maintain an XML file in either a classic network share or a web site. The network share is usually what I see out there, simply because it doesn’t require anything other than a share living on a server/computer somewhere in the domain.
However, using a network share isn’t that flexible with the ways we work today. If a user is working from home or some other remote location, the user doesn’t necessarily have access to the on-prem domain providing the network share with the XML base site list, this means that any changes to existing site lists does not reach the user This also applies to any new site lists you might have created; they will not reach the user until the user have access to the domain with the network share containing the XML site list. You could maintain the XML site list on a web server accessible on both the internal network and external, but then you’ll have yet another server to maintain and secure, as it would probably live in a DMZ.
By now I hope you see where I am going. The Edge Site List feature lives in the cloud, the backend is maintained by Microsoft and as long as you have internet connectivity, it’s accessible and it doesn’t matter if you are on the internal corporate network, working from home, the coffee shop, the airport etc.
Create a new site list
To create a new site list, log on to the Microsoft 365 admin center and then go to Org Settings
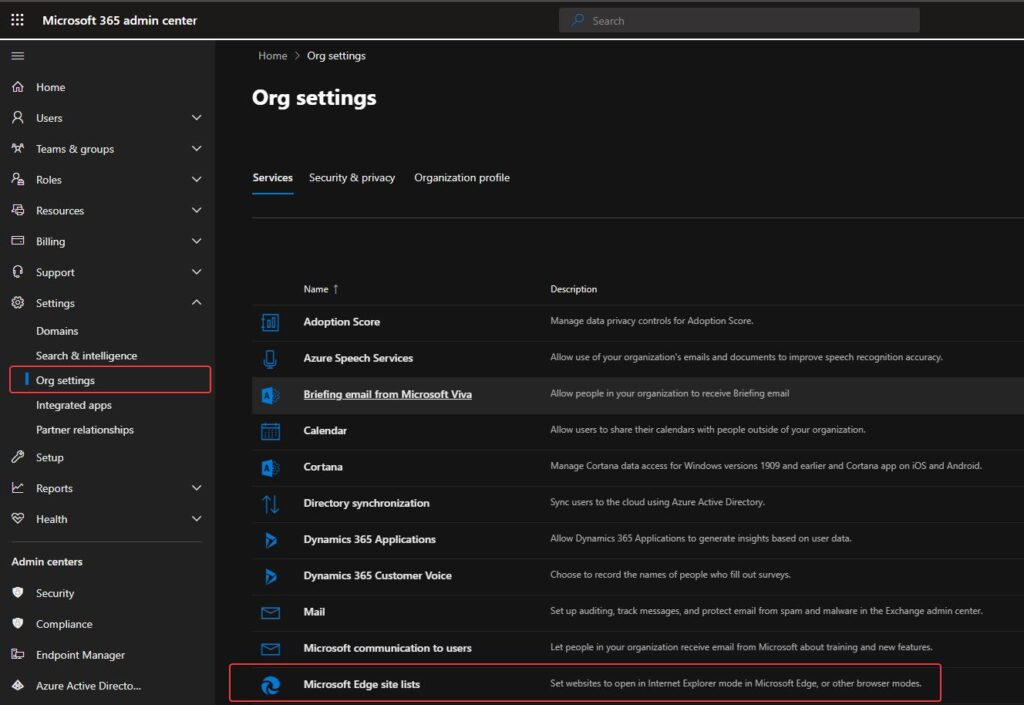
Go to the Microsoft Edge site lists service
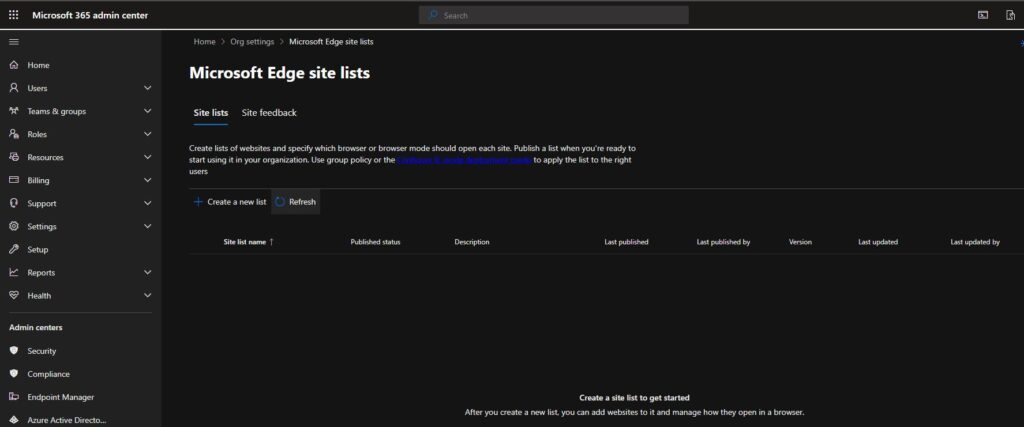
In Create new list wizard you can create a site list

Provide a name and a description.

The new site list is almost ready. Notice the Published status column, it says “Unpublished draft”, currently the new site list doesn’t contain any URLs and it’s not published. A site list has to be published before it can be applied to a computer or user.
Let’s add a couple of URLs to the site list.
Click on the My new site list

Click Add a site
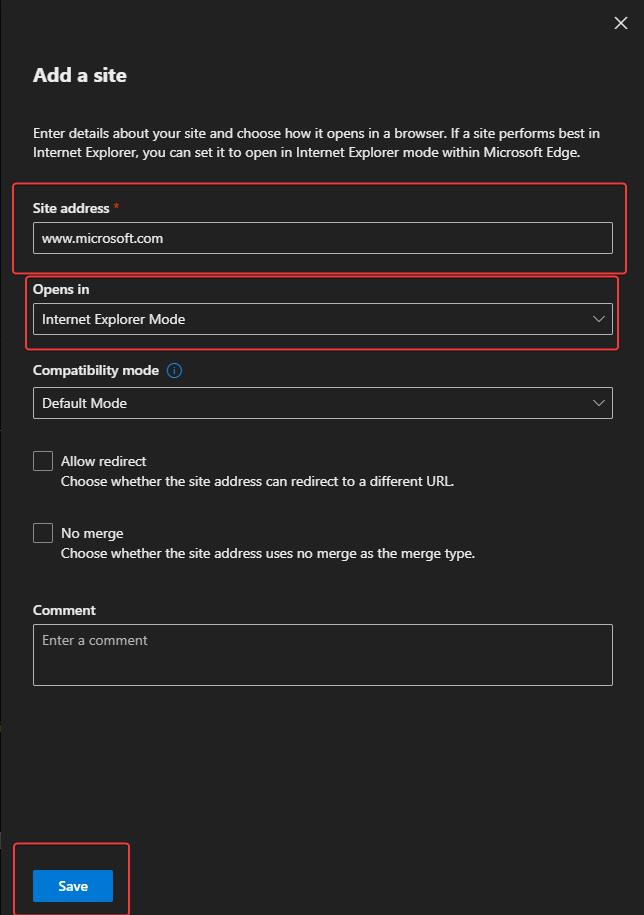
Enter a site address and select Internet Explorer Mode and click Save. This will tell Microsoft Edge to open the URL in IE Mode.
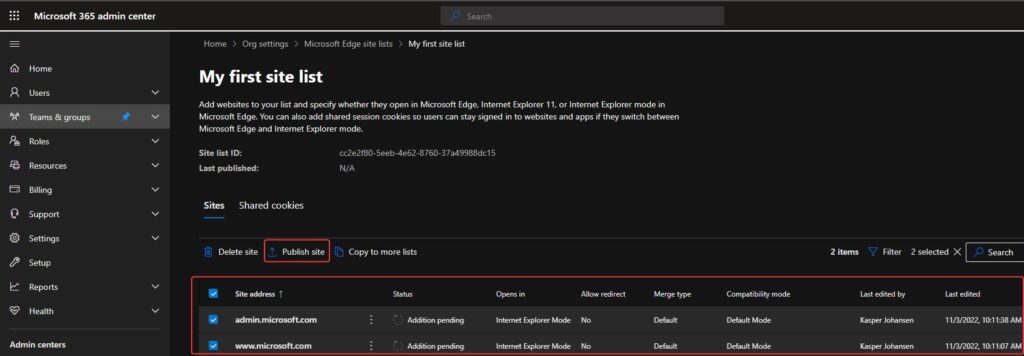
It’s now time to publish the site list. In this example I have included the admin.microsoft.com URL, I wouldn’t recommend that, it’s only here for the sake of demonstrating IE Mode. Select all sites and click Publish site.
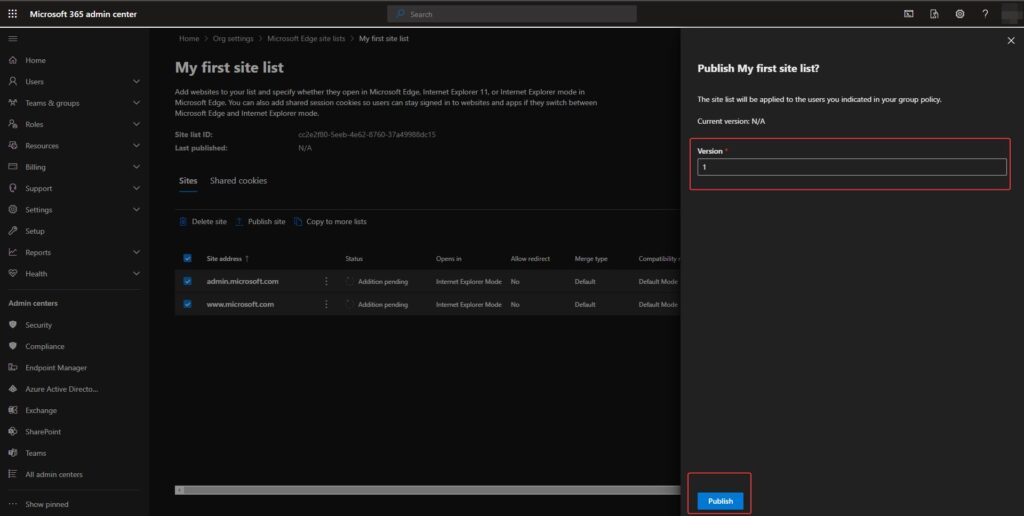
Enter a version. Every time you make changes to the site list, you have to do a version increase.
The version number is important. Whenever Microsoft Edge checks in to the site list service, it looks for the site list version. If there hasn’t been a version increase, since the last check in, Edge does nothing. However, if Edge checks in and there is a version increase, the site list is updated on the computer or for the user.
Each site list has a unique ID. This ID has to be configured in either a group policy or an Intune configuration policy, to tell the computer/user which site list is used.
Keep in mind you can have multiple site lists, if you have a lot of URLs, it might be a good idea to split theses URLs up into different site lists, and then apply these site lists to different computers/users based on department, location etc.
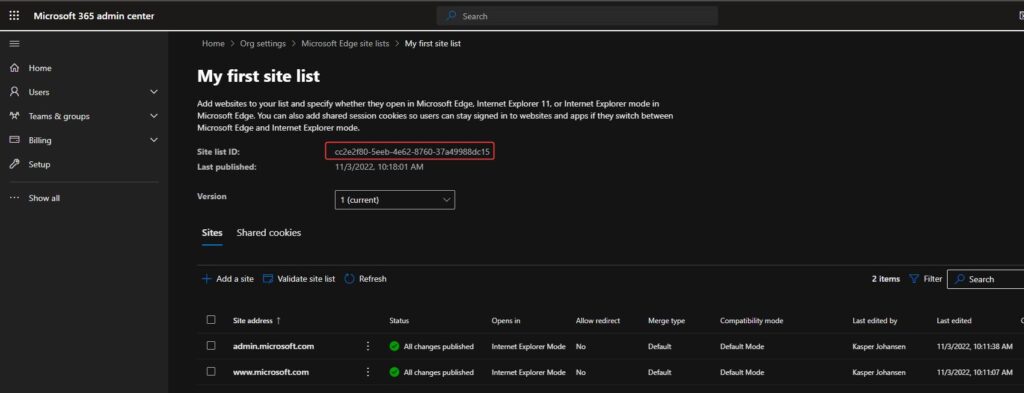
Now all we need is to apply the site list to our Windows computers or users.
Configure the Edge site list via group policy object
Make sure you have the latest group policy administrative templates for Microsoft Edge. Make sure to visit the Microsoft Edge Enterprise website whenever there is a new major release of Microsoft Edge, to get the latest group policy administrative templates.
Create a new group policy object. Go to Computer Configuration\Microsoft Edge
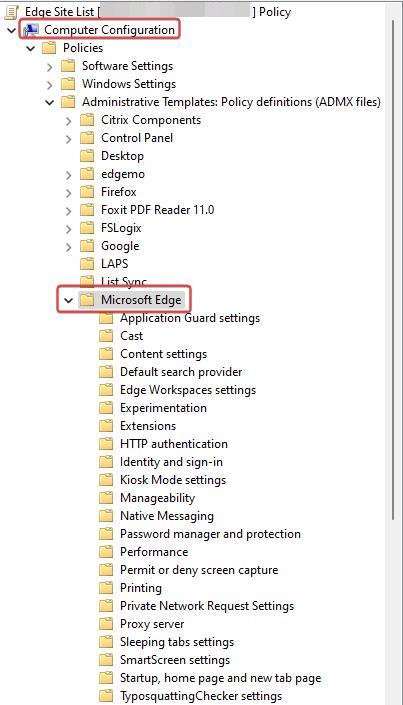
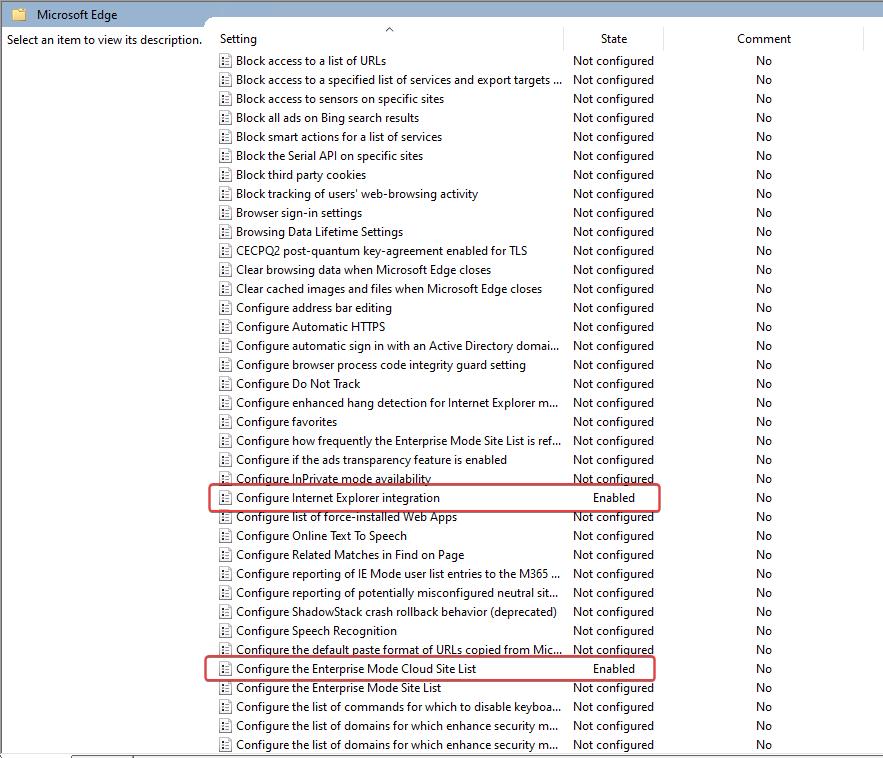
In the Configure Internet Explorer integration policy, in the drop down select Internet Explorer mode. This will enable IE Mode in Edge.
In the Configure the Enterprise Cloud Site List policy, type the site list ID we found earlier. Make sure to target your domain computers.
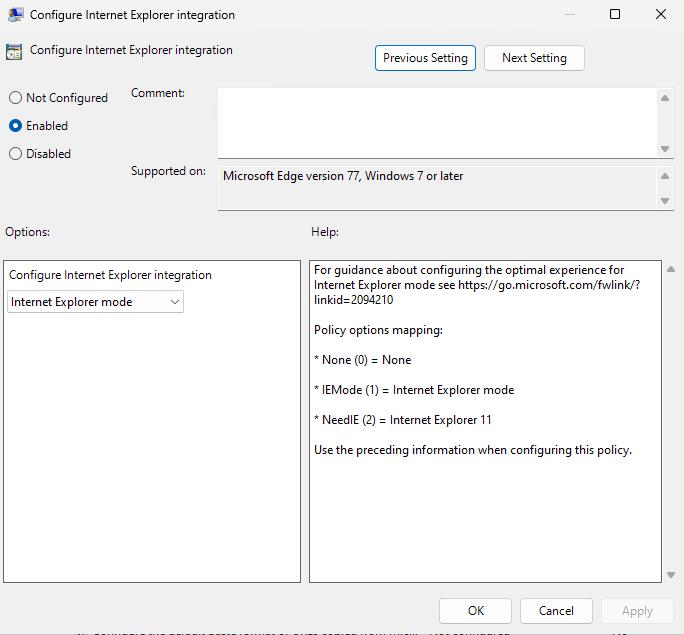

These policies can also be configured as user configuration policies, if you have done that, you will obviously have to target your users and not computers.
Configure the Edge site list via Microsoft Intune
Log on to your Microsoft Intune admin center and create a new configuration policy


In the Microsoft Intune admin center click Device and then Configuration Profiles
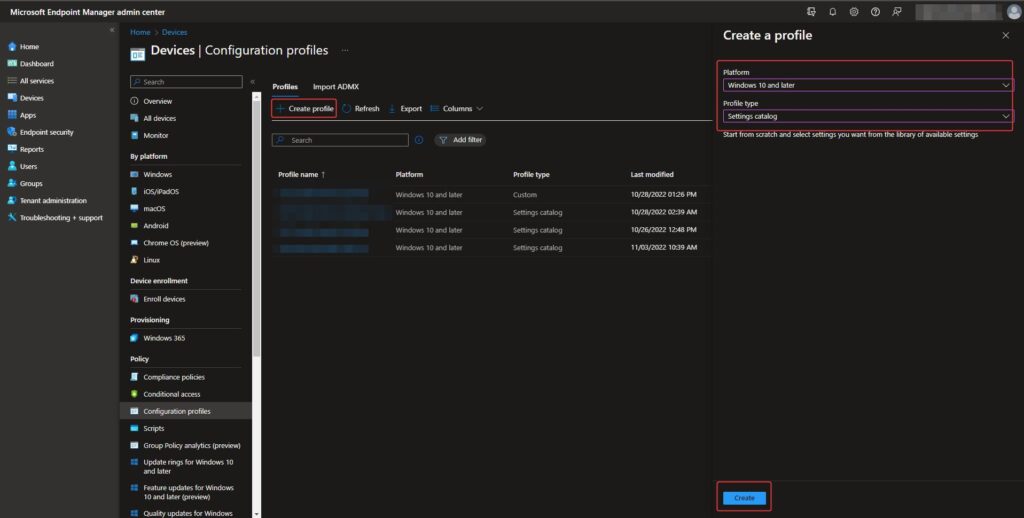
Create a new configuration profile and select settings catalog as profile type
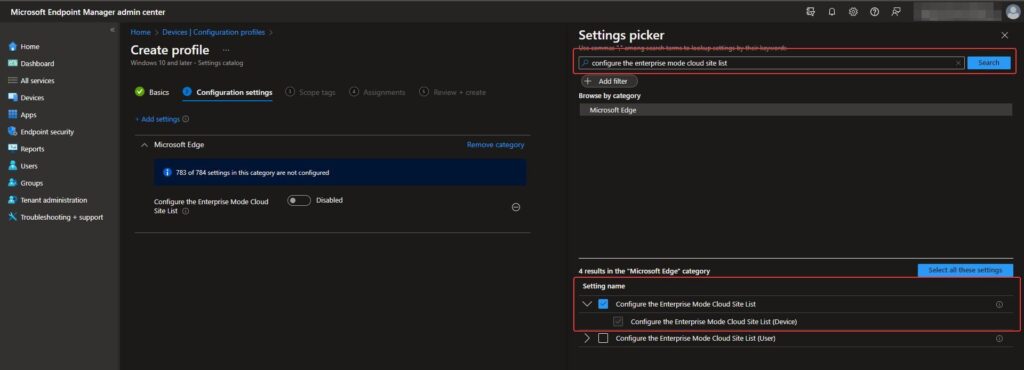
Type configure the enterprise mode cloud site list in the search box and select the Configure the Enterprise Mode Cloud Site List policy.
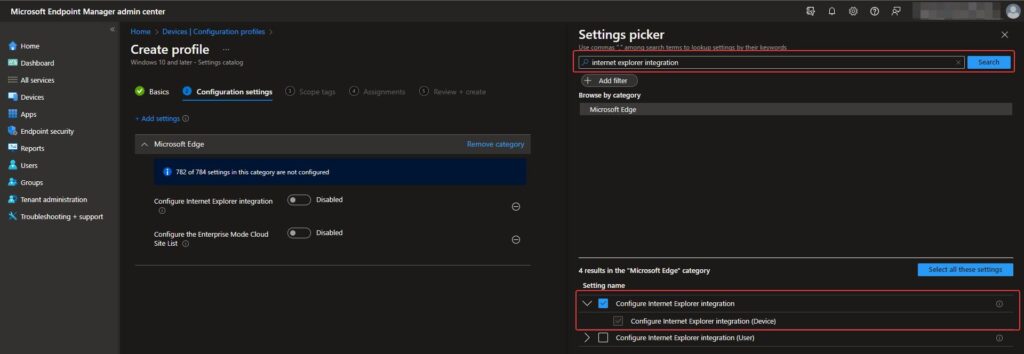
Type internet explorer integration in the search box and select Configure internet explorer inegration
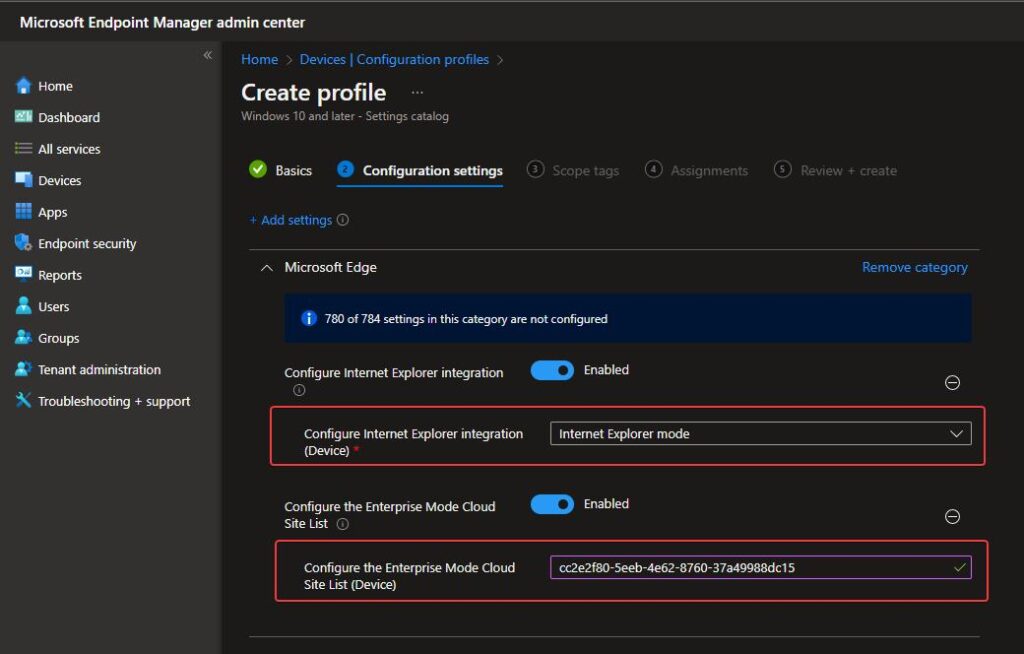
Enable the policies and type the site list ID.
Click through the rest of the wizard and provide an assignment group and applicability rules if needed.
Once again, we have to wait a bit to make sure the new configuration policy has been applied.
Microsoft Edge – How it looks on the user side
Now, let’s see what it looks like from the user’s point of view.

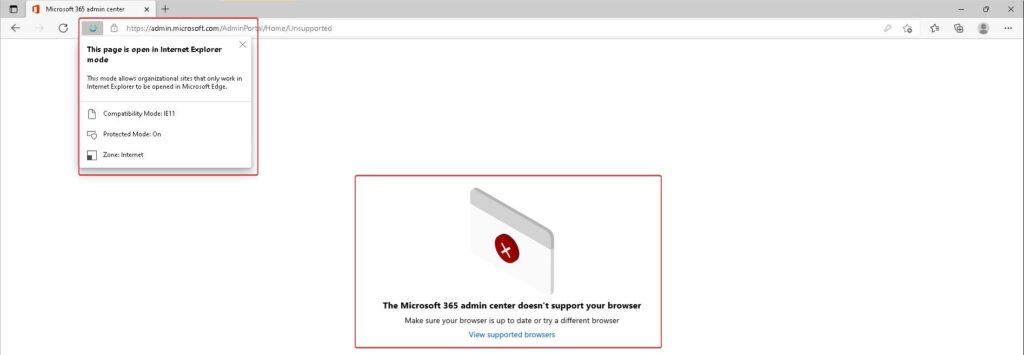
Earlier we configured www.microsoft.com and admin.microsoft.com URLs to open in IE mode. The small blue Internet Explorer icon in the address bar, shows that this specific URL is now in IE Mode.
Also, as mentioned it’s not recommended to open the admin.microsoft.com in IE Mode, Microsoft even posted a warning saying that the site does not support Internet Explorer and that you should try another browser.
With that, you are now able to provide an Edge site list in a modern way, providing flexibility and a better user experience, compared to the “classic” ways of providing site lists.